

INFOGRAPHIC: TO TIE THE KNOT
Jul 06, 2023
One of the dilemmas of men at the stage of late adolescence, when for the first time they have to wear a shirt with a tie, is the knot.
Today 7camicie wants to provide its customers, particularly men but also those women who want to surprise their partner, with some simple instructions for making properly a tie knot.
First we want to specify that there are different knot types, which vary according to personal preferences, and to the occasions in which they are used and, in certain circumstances, according to the dress code or etiquette.
We would like to start from the grass roots: the "Simple knot".
The simple knot is the classic among tie knots. It is the most widely used, because it is the simplest to make and can be matched with the majority of the ties and with all the shirt collars. Perfect for average height or high men.
Conical and elongated, the simple knot is tight if you use thin ties and wider with thick ties.
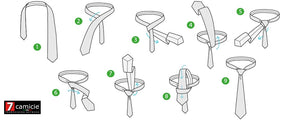
Below, we list 9 steps required to realize the simple knot:
- Lift up the collar of the shirt and button up the top button, then place the tie with its widest part leaning on the left and the narrowest part leaning on the right. To men of average height, we recommend to place the narrowest part at the height of the waist of the neck. The taller men, will be able to place it above the waist of the neck.
- Pull the widest part over the narrowest one.
- Then pull the widest part below and switch it back on the narrowest part.
- Slide the widest part up under the tie, placing the finger in the knot which is being made.
- Remove the finger and slide the widest part in the ring.
- Wind up again the widest part above the formed knot , making it pass over the narrowest part.
- Re-insert the widest part inside the ring, making it slide upwards.
- Holding the narrowest part, loosen the knot and insert the widest part into the front part of the ring, making it slide downwards.
- At this point, the simple knot is ready: you just need to put it in the exact position, perhaps using a mirror.
Nothing could be simpler, thanks to the advice of 7camicie.